Introduction
This document is designed to instruct OpenInsight developers on how to use the NSIS, or Nullsoft Scriptable Install System, to deploy applications and updates. Readers completing the white paper should have enough knowledge to create simple full application installations and simple RDK installers.
This document is not comprehensive, especially considering the extensible nature of NSIS. Advanced users should visit the references below for deeper knowledge.
References
- NSIS Website: http://nsis.sourceforge.net
- NSIS Forums: http://forums.winamp.com/forumdisplay.php?s=&forumid=65
- Wikipedia: http://en.wikipedia.org/wiki/Nullsoft_Scriptable_Install_System
- NSIS Online Help: installed with NSIS
NSIS
NSIS is an extensible script-driven installation system for the Windows platform. It was originally developed to distribute Winamp, Nullsoft's widely popular media player. It started life as a product called PiMP (Plug-in Mini Packager), became NSIS when Nullsoft moved it to open source, and is now NSIS 2.
People Like NSIS Because…
- NSIS installers are much smaller than those produced by most commercial tools due to a very small overhead size and better compression algorithms. Assuming no plug-ins are used, an NSIS installer has an overhead of only 34 KB.
- NSIS supports a simple plug-in architecture, thus making it easy to accomplish very specific tasks not already supported. While plug-ins must be written in C or C++, they are very simple and require very little resources.
- NSIS is entirely scripted, so there are no convoluted user interfaces or secret features buried deep with dialog boxes and menus.
- NSIS installers are very responsive. They execute immediately without the delay seen in InstallShield, and the install wizard moves from page to page without pauses.
- NSIS is free, making installation technology more accessible to those on tighter budgets.
People Avoid NSIS Because…
- NSIS scripts use an assembler like language that may be discouraging to some users. This is really a subjective reason, but one that newcomers should consider.
- NSIS is feature rich but not feature complete. NSIS installers cover most installation needs and accomplish the most common tasks with ease, but more complex solutions require a lot of effort to develop.
- NSIS has no debugger, so tracking down errors in your script is cumbersome. NSIS developers get into the
habit of showing message boxes to view the values of variables.
- NSIS has limited string parsing capabilities. BASIC+ developers may be particularly sore at the comparative lack of string support. While string manipulation is present, its use will certainly feel cumbersome when compared to BASIC+.
Getting Started
In order to build your own NSIS installers, you’ll can be any text editor, but consider our recommendations below. NSIS does not come with a script editor.
Installing NSIS
Installing NSIS is easy. You can download the installer from the NSIS website. Run the installer and follow its simple steps. You may be interested to know that the NSIS installer was created with NSIS!
TIP: Make a note of the NSIS directory. You'll need to go there to install plug-ins. By default NSIS installs into C:\Program Files\NSIS.'
Script Editor
NSIS runs on scripts, so you’ll need to write them using any number of available text editors. This can range from plain text editors like Notepad to advanced editors like Notepad++. Although any text editor productive using a tool that can also interface with the NSIS compiler. We’ll discuss the two main editors listed on the NSIS website.
Eclipse
Eclipse Eclipse is a popular open source IDE (Integrated Development Environment) written in Java. It is designed to interface with any command line compiler, such as NSIS. It also supports syntax highlighting for a large number of languages. You can download the NSIS Eclipse plug-in from the NSIS website and install it to use Eclipse to edit and compile your scripts.
Eclipse is a very powerful and reliable tool. If you already use Eclipse for other development, then the NSIS Eclipse plug-in will be the preferred option. If, however, you do not have an existing script editor in mind, consider this next application.
HM NIS Edit
HM NIS Edit is a standalone editor for writing NSIS installers. It’s more lightweight than the Eclipse plug-in, but it provides the same syntax highlighting and compiler integration. HM NIS Edit also provides handy links to the most common NSIS development resources on the internet.
There are, of course, other tools available, but these are the two most notable NSIS editors. Feel free to experiment with these and other offerings to find the environment that best suits your programming style
Anatomy
Before we dive into writing an NSIS installer, it’s helpful to understand the many elements that go into creating an NSIS script.
Commands
NSIS provides a very large set of commands. Commands are single-lined statements that instruct the installer to do something. In NSIS, some commands execute at runtime while others execute at compile time. Compile time occurs when using NSIS to build the installer. Runtime occurs when the user runs the installer. We will see just a small number of the available commands in the next section, but know that there are many more commands that accomplish just about every installation task you can imagine. Be sure to browse the NSIS online help for a complete list.
Variables
Writing scripts wouldn’t be possible without variables. There are three kinds of variables in NSIS scripts: user variables, registers, and predefined variables. User variables are ones you can define and name, so long as the name does not conflict with the next type of variables. Registers are variables that always exist. There are 20 registers: $0-$9 and $R0 and $R9. Finally, there are predefined variables. These variables always exist and are often constant—containing useful information such as special directories. For example, the $WINDIR variable points to the current system’s Windows directory.
Variables are always global to the entire script, even user variables. See the NSIS online help for details on how to declare and reference these different kinds of variables. The next section will not use variables in the examples, but there are plenty of examples available in the References section.
Installer Attributes
Installer attributes define the behavior and look of your installer. Minus a few exceptions, installer attributes must appear outside of any function, section or other code block. Some installer attributes run only at compile time and define the static properties of your installer while others alter the behavior at runtime. It will help to think of installer attributes as properties.
Plug-Ins
A very important element of NSIS scripts is the ability to call plug-ins written by third parties. Details on using plug-ins are discussed below in the SRP Plug-in section below. For now, it sufficient to point out the ability to access additional functionality provided by plug-ins which would be otherwise unavailable via the built-in commands.
Labels
Labels are important to NSIS scripts because there is no default support for flow controls statements, i.e., if/then statements, for loops, while loops, etc. Support for these types of statements was later added via a clever use of macros, but there use falls outside the scope of this document. See the References section for details. Many statements, such as the ones the compare numbers or strings, can jump to these labels directly thereby providing low-level flow control. For instance, the StrCmp command can jump to one label if two strings are equal or to a different label if they are different. As usual, see the online help for details.
Pages
When your installer executes, a wizard is presented to the user. NSIS has four built-in install pages:
- License – Displays a license agreement and asks the user to select “Yes” to agree to the agreement or “No” to abort the installation.
- Components – Displays a list of components and asks the user to choose which ones to install.
- Directory – Displays the currently install directory and asks the user to choose an alternative install directory if
desired.
- InstFiles – Displays the installation progress and notifies the user when it is complete.
NSIS has two built-in uninstall pages:
- UninstConfirm – Displays a message notifying the user that the product is going to be removed from the system and asks the user to confirm.
- InstFiles – Displays the uninstall progress and notifies the user when it is complete.
Your script defines which of these pages will appear and when, except for the InstFiles page, which always appears during the actual installation process. Sections Every script must have at least one section. Sections define the components your installer plans to install. For instance, your installer might contain several from among which the user can pick and choose. Each tool would appear on the components page which asks the user to select which tools to install. In the script, you’d create a section for each tool. Of course, you can also have a single default section that always runs regardless of the user’s selection. Functions Functions are blocks of code that can be called from within other functions or sections. Functions can be called directly by the programmer to execute reusable logic or can be called by the NSIS system in response to events. In the second case, these are referred to as callback functions. The syntax is the same in either case.
Macros
NSIS scripts support the use of macros. Macros also contain reusable blocks of code, but instead of being called, they are used to insert the block of code at compile time. This is useful for reusing code snippets or inserting multiple functions and sections at once.
Scripts
The cornerstone of NSIS technology is the script. An NSIS script is merely a text file with the .nsi extension. A single script will become a single executable. Shared or reusable code can be placed into header files with the .nsh extension. So, any one installer will be generated from one .nsi file and zero or more .nsh files.
The easiest way to become familiar with the NSIS scripting language is by example.
Bare Minimum
Let’s start by writing a script that contains the absolute bare minimum.
# Name the installer
OutFile "MyInstaller.exe"

# Every NSIS script has at least one section.
Section
SectionEnd
As you can see, only two elements are needed to create an installer: the name of the installer and a Section. The installer will do nothing except show you that it’s finished.
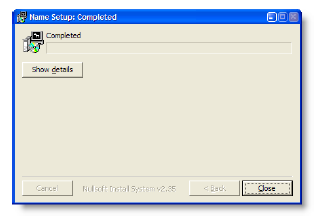
It helps to notice that even though we did explicitly request any pages to display to the end user, NSIS displayed a progress window anyway. There are a variety of ways to make a silent installer—an installer with no user interface. This document does not discuss how this is accomplished, but you can consult the references in the beginning of this document for instructions on doing this yourself.
Let’s modify our bare minimum installer to perform some minor installation procedures.
Simple Install
In this next example, we add three new commands, seen below in red.
# Name the installer
OutFile "MyInstaller.exe"

# Define the directory to install to using one of the predefined constants
InstallDir $DESKTOP

# Every NSIS script has at least one section.
Section

   # Define the output path for this file
   SetOutPath $INSTDIR

   # Define what to install and place it in the output path
   File "c:\test.txt"

SectionEnd
The first instruction, InstallDir, is an installer attribute, so it appears outside of the section. It is used to initialize the built-in INSTDIR variable. It’s possible, later, to modify the INSTDIR variable directly at runtime from within a section or function.
The SetOutPath instruction sets the target install directory at runtime. This command is ignored during compilation.
The File command is executed in both compile time and runtime. At compile time, this instruction identifies the file to be packaged into the installer. At runtime, it copies the file into the current install directory.
The result is an installer that executes faster than the eye can see, since we're only installing a single, very small file. The difference now is that the progress bar is full, indicating all files were installed.
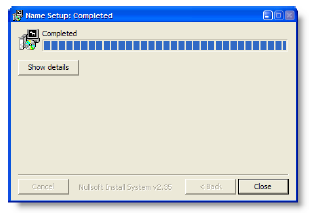
The installer generated by the script is still overly simple, but the concept is the same for large installers. Set the output directory, copy the files, set the output directory, copy the files, etc. Now let’s make the installer more interesting by adding some pages.
Adding Pages
Once again, the changes to our script are shown in red.
# Name the installer
Name "Super Application"
OutFile "MyInstaller.exe"

# Define the directory to install to using one of the predefined constants
InstallDir $DESKTOP

# Define the pages to be displayed (order matters)
Page License
Page Directory
Page InstFiles

# Define the text file to be displayed on the license agreement page
LicenseData "c:\license.txt"

# Every NSIS script has at least one section.
Section

 # Define the output path for this file
 SetOutPath $INSTDIR

 # Define what to install and place it in the output path
 File "c:\test.txt"

SectionEnd
The first change to notice is the addition of the Name command. This command is an installer attribute used to store the name of the application or product being installed. The value given to this command will appear on the installer pages whenever the application name is used.
The Page command establishes the page to be displayed to the user and accepts, as a parameter, one of the following values: License, Components, lDirectory, InstFiles, UninstConfirm or Custom. The first four options are built-in installer pages. The UninstConfirm option is a built-in uninstaller page. The Custom option indicates a custom built page. We'll get into custom built pages later. For now, sufficient to note that this installer is showing the license page, followed by the directory page, followed by the installation progress page.
TIP: The order of the pages depends on the order of the Page statements. In the above example, to show the directory page before the license page, simply reverse the order of those two statements.
The license page would be useless without an actual license agreement, so the LicenseData command is used to tell NSIS where to find the text or RTF formatted license file. The file will be packaged into the installer automatically and displayed in the license page.
When we run the installer, we see the pages we added to our script:
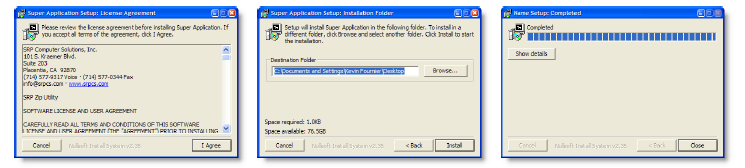
As you can see, it's very simple to create a basic installer. Unfortunately, the standard user interface looks plain and outdated. Nullsoft and the NSIS open source community have been aware of this for some time and have created alternative user interfaces. Let's improve the look and feel of our user interface by incorporating the latest Modern User Interface functionality.
Modern User Interface
In response to the rather outdated look of standard NSIS installers, the developers at Nullsoft created a plug-in called Install Options. With Install Options, users could create custom pages using INI files that described the layout of various controls on a page. The Modern User Interface, or MUI, took full advantage of the plug-in, providing a comprehensive set of functions and macros to make custom page creation possible.
Unfortunately, MUI was not without its limitations. First, it was difficult to respond to control events since INI files are static. Second, the INI files had to be maintained separately, forcing the developer to ensure the INI file was packaged with the installer and extracted during the initializing of the installer. Therefore, MUI was prone to error and cumbersome to use.
Despite these flaws, MUI still remains the most popular user interface choice for NSIS developers due in large part to its tenure as the only Nullsoft made user interface library and in small part to its reliability. However, this is all about to change with the release of NSIS 2.35 and the Modern User Interface 2.
Modern User Interface 2
Nullsoft recently replaced the Install Options plug-in with the nsDialogs plug-in. The nsDialogs plug-in brings control back to the developer by allows custom page creation to be done entirely within the script. The need for INI files is history. Furthermore, nsDialogs provides a much more developer-friendly callback system, making it easy to respond immediately to user actions on a custom page.
Nullsoft quickly updated the Modern User Interface to use only the nsDialogs plug-in, thus creating its sequel, MUI2. MUI2 uses the same macros and functions as MUI, but eliminates the need to worry about packaging and managing INI files. Since MUI2 is the future, the example scripts in this document will use MUI2 exclusively. Therefore, let’s modify our working script again to use MUI2 to make the user interface more exciting. Note the changes in red:
!include "MUI2.nsh"

# Installer information
Name "Super Application"
OutFile "MyInstaller.exe"

# Define the directory to install to using one of the predefined constants
InstallDir $DESKTOP

# Define the pages to be displayed (order matters)
!insertmacro MUI_PAGE_WELCOME
!insertmacro MUI_PAGE_LICENSE "c:\
!insertmacro MUI_PAGE_DIRECTORY
!insertmacro MUI_PAGE_INSTFILES
!insertmacro MUI_PAGE_FINISH
!insertmacro MUI_LANGUAGE "English"

# Every NSIS script has at least one section.
Section

   # Define the output path for this file
   SetOutPath $INSTDIR

   # Define what to install and place it in the output path
   File "c:\test.txt"

SectionEnd
The first obvious change our script is the !include statement at the very top, which tells the NSIS compiler to include all the MUI2 functions and macros. The real work, however, is done by the !insertmacro statements further down. These statements insert the MUI2 macros, which do all the heavy lifing for us. Similar to the Pages command, we call the macro for the pages we want, in order.
Note that the LicenseData command was removed. Since macros accept parameters, the designers of MUI2 decided to make our lives a little easier by accepting the license data via a simple parameter.
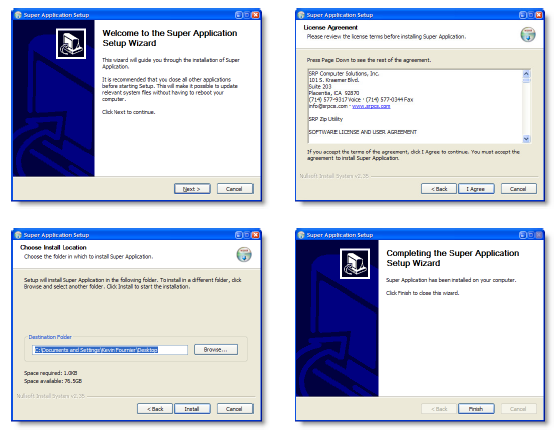
In addition to the license, directory, and install files pages add in our previous script, this script includes welcome and finish pages. These pages are more than just a nice bookend to your installer; they serve a functional purpose as well. The welcome page shows the name of the application being installed and is a good place to inform the user of any important instructions, such as closing certain applications before continuing. The finish page provides options for allowing the user to immediately run the application or display a readme or help file.
TIP: The MUI_LANGUAGE macro cannot be omitted. It's used to determine which language to use for the predefined messages that appear on each page. If you forget to include this macro, your pages will be blank.
The MUI2 pages are graphically richer than the original pages and provide a nice way to bookend the install experience. Run this script to see the new and improved Modern User Interface.
Now let’s look at a couple customization features available to MUI2 users.
Customizing the User Interface
For our final example, let's look at some other useful commands. As usual, we've added new commands in red to our working script.
First, we've added four installer attributes to modify the behavior of the installer:
1. The SetCompressor command determines the compression algorithm. The LZMA algorithm will make your installer as small as it can be.
2. The BrandingText command customizes the text that appears on the face of the installer. By default, the branding text is set to "Nullsoft Install System" followed by the version number.
3. The RequestExecutionLevel command is necessary for installations running on Windows Vista. Setting this attribute to "highest" ensures that the installer runs at the highest available permissions level.
4. The AllowRootDirInstall command is useful if you want to allow users to install to a root drive, such as "C:\". Sometimes, users map a drive directly to an OpenInsight folder.
Additionally, we added some customizations to MUI2 using the !define command. MUI2 allows uses the definitions to customize the user interface. We added four lines of customization:
1. MUI_HEADERIMAGE simply tells MUI2 that we intend to supply a custom image for the page headers. 2.MUI_HEADERIMAGE_BITMAP defines a custom image for the page headers. 3. MUI_WELCOMEFINISHPAGE_BITMAP defines a custom image for the welcome and finish pages. 4. MUI_FINISHPAGE_SHOWREADME instructs MUI2 to display a "Show Readme" check box that, when checked, causes the given file to be opened when the user presses the Finish button.
!include "MUI2.nsh"

# Installer information
Name "Super Application"
OutFile "MyInstaller.exe"

# Other installer attributes
SetCompressor lzma
BrandingText "My super cool slogan!"
RequestExecutionLevel highest
AllowRootDirInstall true

# Define the directory to install to using one of the predefined constants
InstallDir $DESKTOP

# Customize the MUI2 interface
!define MUI_HEADERIMAGE
!define MUI_HEADERIMAGE_BITMAP "..\HeaderImages2\02.bmp"
!define MUI_WELCOMEFINISHPAGE_BITMAP "..\WizardImages\36.bmp"
!define MUI_FINISHPAGE_SHOWREADME "c:\test.txt"

# Define the pages to be displayed (order matters)
!insertmacro MUI_PAGE_WELCOME
!insertmacro MUI_PAGE_LICENSE "c:\license.txt"
!insertmacro MUI_PAGE_DIRECTORY
!insertmacro MUI_PAGE_INSTFILES
!insertmacro MUI_PAGE_FINISH
!insertmacro MUI_LANGUAGE "English"

# Every NSIS script has at least one section.
Section

   # Define the output path for this file
   SetOutPath $INSTDIR

   # Define what to install and place it in the output path
   File "c:\test.txt"

SectionEnd
Executing this script provides the end user with a customized interface. In this example, the custom images were downloaded from the internet, but you can feel free to make your own images as well.
There are, of course, many more ways to customize an NSIS installer, including the ability to make custom pages. While custom pages are important to many installation developers, this document considers it an advanced technique and will not discuss it. Instead, we'll take a look at the templates and plug-ins provided by SRP Computer Solutions, Inc.
SRP Plug-in
SRP has been using NSIS to create installers for many of its utilities for quite some time now. As a result, we’ve developed a plug-in to give our installers access to things normally unavailable to NSIS installers. Before we discuss the details of our plug-in, let’s review how to use plug-ins in NSIS.
What Exactly is a Plug-in?
An NSIS plug-in is simply a DLL whose exported methods conform to a standard signature. Normally, you will not write your own plug-ins unless you need very unique behavior. For instance, SRP chose to write a plug-in to simplify the ability to install RDKs. If you need unique functionality, look online for one that might already meet your needs. If that fails, you can always <shameless plug> hire us to write one for you. </shameless plug>
Information on writing your own plug-in using C or C++ can be found using any of the references listed in the References section of this document.
Using Plug-ins
Plug-ins are very easy to use. In fact, they can be referenced directly in a script so long as they are located in the NSIS Plug-in directory:
${NSISDIR}\Plugins
${NSISDIR} is the installd location of NSIS, usually C:\Program Files\NSIS. Simply place any plug-in you download or write into this directory. For example, our plug-in—SRPUtil.dll—must be placed into this directory if you wish to use it.
Once installed, simply use the special plug-in syntax to call one of its methods. The online NSIS help discusses how to do this, but here is the syntax:
plugin::function [/NOUNLOAD] param1 param2 … paramN
Plugin is the name of the plugin DLL, minus the “.dll” file extension, and function is the function within the plug-in to call. The parameters are separated by spaces, so be sure to surround them in quotes to avoid confusion.
An optional flag, that must appear before the parameters when used, is the /NOUNLOAD flag. This flag is very important. When included, it tells NSIS to leave the plug-in DLL loaded in memory. If excluded, then the DLL is unloaded from memory as soon as the call ends. Therefore, always remember to use the /NOUNLOAD flag when making multiple calls. This is especially important, as well see, when using SRP’s plug-in.
SRPUtil Plug-in
The SRPUtil provides several useful features to make easier the development of your installer. Let’s look at each function in detail.
addFirewallException
| Item | Description |
|---|---|
| Syntax: | srputil::addFirewallException fileName appName |
| Description: | This method adds the given executable to the Windows Firewall Exception list. Without this, first time installs of OpenInsight will cause the OS to display a warning dialog asking if the user should allow OpenInsight to connect to the internet. Furthermore, even the installer itself can generate this popup, so it’s useful to add the installer to the list as well. |
| Parameters: | fileName – The path and file name of the EXE file to add to the list |
| appName – The readable name of the EXE that the user will see in the dialog |
When creating full installs of your application, you’ll want to use this method to Oinsight.exe and Oengine.exe to the Firewall Exception List. This method does nothing in Windows 2000 and earlier. Furthermore, it will first ensure that the given EXEs are not already in the list.
Here is an example of how this is used in an RDK installer:
; add oinsight.exe, oengine.exe, and this installer to the Windows Firewall exception list
srputil::addFirewallException /NOUNLOAD "$EXEPATH" "${PRODUCT_NAME} Installer"
srputil::addFirewallException /NOUNLOAD "$INSTDIR\oinsight.exe" "$INSTDIR\oinsight.exe"
srputil::addFirewallException /NOUNLOAD "$INSTDIR\oengine.exe" "$INSTDIR\oinsight.exe"
Notice that we use the /NOUNLOAD flag to keep the plug-in loaded. That’s because we plan to use the other methods of this plug-in later in the installer. The first line adds the installer itself to the list. We must do this since we plan to run Oinsight.exe using our plug-in, and apparently, this causes the installer to be guilty by association. The second two lines add oinsight.exe and oengine.exe to the list as well.
startOI
| Item | Description |
|---|---|
| Syntax: | srputil::startOI /NOUNLOAD app username password |
| Description: | This method starts a new engine using REVCAP32.DLL located in the current directory. Therefore, it is important to set the working directory using the working directory using the SetOutPath command. Simply pass the application you wish to log into and a valid username and password. Always using the /nounload option since you’ll need to explicitly shutdown the engine later. |
| Parameters: | app – The application to log into, such as SYSPROG |
| username – A valid login username | |
| password – A valid password''''' |
This method starts a new engine silently in the background. The engine will not appear in the taskbar. Every time you call this method, the $0 register is set with a response. The ideal response is “1”, since this indicates the engine was successfully created. If the response is not “1”, then it will be one of the following errors:
- “Could not find REVCAP32.DLL” – This means that REVCAP32.DLL wasn’t found in the current working directory. You either failed to set the working directory using SetOutPath or the working directory is not a complete OI directory.
- “Could not initialize API” – This means that the call to RevInitializeAPI in REVCAP32.DLL failed. This should not happen. If it does… call Revelation.
- “Invalid Application” – This means that the application you supplied does not exist in this copy of OI. You should ask the user to try entering the application name again.
- “Invalid username or password” – This means that the login credentials could not be verified. Ask the user to try entering the username and password again.
After this method successfully completes, an OpenEngine is running happily in the background waiting for commands. For this reason, never omit the /NOUNLOAD option for this call. You must call the next method before the installer exits, whether or not the user completed the install or aborted.
shuttdownOI
| Item | Description |
|---|---|
| Syntax: | srputil::shutdownOI |
| Description: | This method shuts down the running OpenEngine, if there is one. There is no harm in calling this if an engine isn’t running. Call this when the installer exits, even if it was because the user aborted. |
| Parameters: | none |
This method is very easy to use since it needs no parameters. The plug-in can only run one background engine at a time, so it knows how to close it. If an engine is not running, then this call simply does nothing. As stated multiple times already, make sure you call this method at the end of an installer, even if it was aborted. Otherwise, an engine might remain stuck in memory forever, which consumes a user slot.
Like startOI, shutdownOI sets the $0 register to a return value. If there were no problems, then the value is “1”, even if there wasn’t an engine running to begin with. The only error message this method returns is, "Could not terminate APO", which occurs when the call to RevTerminateAPI in REVCAP32.DLL fails. This shouldn't happen, but if it does....call Revelation.
runCommand
| Item | Description |
|---|---|
| Syntax: | srputil::runCommand /NOUNLOAD command |
| Description: | This method runs a command and sends the process information to the InstFiles page window. If the command is RDKINSTALL, then the progress bar is updated with the current progress as well. Always use the /NOUNLOADoption since you'll need to explictly shutdown the enginge later. |
| Parameters: | command – The complete command line to execute |
This method is the special prize in the proverbial cracker-jack box. Until now, the only way to interact with an OpenEngine was to use Revelation’s own RDKINSTP.DLL. While this DLL can certainly get the job done, it was written for a much older version of InstallShield and therefore lacks two things: the ability to use the NSIS interface and the ability to run OpenInsight silently in the background.
Assuming you’ve started an engine using startOI, you can call this method as much as you like, passing any valid OI command string. The primary use will be to run RDKINSTALL, but any valid command line will work.
The trick is to call this only during the InstFiles page’s Leave event. Doing so guarantees two things:
1. Whenever the command calls SendInfo, the information is displayed on the InstFiles page’s details window.2. If the command is RDKINSTALL, runCommand will update the InstFiles page’s progress bar with the current progress of the install.
Here’s an example of an InstFiles page’s Leave event executing RDKINSTALL:
Function InstallLeave

   ; Execute RDKINSTALL, we don't need to call startOI because we did that during the
   ; Application Login Page's leave event. Note that runCommand will route messages form
   ; OI to the InstFiles page window... it even updates the progress bar!
   SetOutPath $INSTDIR
   srputil::runCommand /NOUNLOAD 'RUN RDKINSTALL "$INSTDIR\SRPRDKINSTALL"'
   srputil::shutdownOI

   ; remove the temporary rdk install folder
   RMDir /r $INSTDIR\SRPRDKINSTALL

FunctionEnd
The result is a completely seamless end user experience. Of course, you’ll want to warn the user to keep OI closed to avoid using too many user licenses. Also, make sure to always include the /NOUNLOAD flag since you’ll need to call shutdownOI later.
With that, we’ve discussed all the functions provided by the SRPUtil plug-in. While the number of functions is small, we think you’ll agree that the added functionality will make your installs no less than stellar.
SRP Templates
SRP provides two templates you can use as boilerplates for your next NSIS installer. The SRP OpenInsight Template creates an installer for an entire OpenInsight folder. This template is ideal for those wishing to create a clean and simple installer for their entire application. The SRP RDK Template builds an installer that will package an RDK and install it into an OpenInsight application of the user’s choice. This template will be useful for those who need a simple way for users to apply updates or install special tools.
Installation
Installing the templates and our plug-in couldn’t be easier because we used NSIS to create a simple installer for you. Simply run the installer, and select the directory into which the templates are to be installed. Note that, regardless of the directory you choose, the srputil.dll will always be installed into the NSIS plugins directory. If NSIS is not installed, then make sure to download and install NSIS 2.35 or greater.
If you do not have a copy of our NSIS Utilities installer, please contact us or visit our website to secure a copy. Our contact info is on the cover page of this document.
SRP OpenInsight Template
This template file is SRP_Template_OI.nsi. Upon opening this template, you’ll notice it is fairly large: more than 400 lines long. The only portion that concerns you for now is the Product Information section. This is where you will customize the installer for you complete application installer. Let’s take a look at this section now:
#########################################################################################
# Product Information
#########################################################################################

; Product Information
!define PRODUCT_NAME                "My Application"
!define PRODUCT_VERSION             "1.0"
!define PRODUCT_PUBLISHER           "My Company, Inc."
!define PRODUCT_WEB_SITE            "http://www.mycompany.com"
!define PRODUCT_PHONE               "(555) 555-5555"
!define PRODUCT_ICON                "MyApp.ico"
!define PRODUCT_ICON_LOC            "C:\MyIcons"

; Install Information
!define INSTALLER_NAME              "C:\MyInstalls\MyInstaller.exe"
!define SOURCE_OI_DIRECTORY         "C:\MyAppFolder"
!define DEFAULT_INSTALL_DIR         "C:\MyTargetFolder"
!define LICENSE_FILE                "C:\MyLicense.txt"
#!define CUSTOM_BRANDING            "My Catchy Phrase"

; Shortcut Information
!define DESKTOP_SHORTCUT
!define STARTMENU_SHORTCUTS
!define SHORTCUT_COMMAND            "oinsight.exe /ap=SYSPROG /un=SYSPROG"

; Uninstall Information
!define CREATE_UNINSTALL

; Installer Graphics
#!define INSTALLER_ICON             "C:\MyIcons\MyInstall.ico"
#!define WIZARD_BITMAP              "C:\MyImages\MyWizard.bmp"
#!define HEADER_BITMAP              "C:\MyImages\MyHeader.bmp"

; Uninstaller Graphics
#!define UNINSTALLER_ICON           "C:\MyIcons\MyUninstall.ico"
#!define UN_WIZARD_BITMAP           "C:\MyImages\MyUnWizard.bmp"
#!define UN_HEADER_BITMAP           "C:\MyImages\MyUnHeader.bmp"
NOTE: This code has been formatted to fit this document. The actual code includes detailed comments.
The first section, Product Information, is used by the template to identify the product and its maker—you. PRODUCT_NAME andPRODUCT_VERSION identify the product itself and are required. PRODUCT_PUBLISHER is the name of your company and is also required. PRODUCT_WEB_SITE and PRODUCT_PHONE are used by the installer to display contact information to the user in the Windows Add and Remove Programs control panel. These are optional, and commenting them out simply causes no contact information to appear in the control panel. Lastly, the PRODUCT_ICON and PRODUCT_ICON_LOC definitions identify the icon that will be displayed next to the entry in the Add and Remove Programs control panel. Note that the icon identified here is not the installer icon; that is set later. These are also optional.
The second section, Install Information, customizes the installer itself. INSTALLER_NAME is vital as it determines the name and location of the installer that will be built. SOURCE_OI_DIRECTORY points to the OI application you wish to package and install. This value is required since no files can be installed without it. DEFAULT_INSTALL_DIR sets the default install directory that will be presented to the user in the Directory page. LICENSE_FILE is optional and sets the license to which the user will be asked to agree. If you comment out this value, then no license page is shown. The CUSTOM_BRANDING value can be uncommented and customized to any text you wish. Leaving it commented out will cause the standard NSIS branding to appear.
The Shortcut Information contains two flags and one setting. DESKTOP_SHORTCUT, when active, causes the installer to create a desktop shortcut that will run your application. The shortcut uses the PRODUCT_NAME as its name. STARTMENU_SHORTCUTS, when active, causes the installer to add a folder to the Start Menu’s Programs folder named after PRODUCT_NAME. Two shortcuts are added to the folder: A shortcut that will run the application and a shortcut that will run the uninstaller. You can comment either or both of these out to avoid installing shortcuts. If you plan to use either flag, then be sure to set SHORTCUT_COMMANDto the command line that the shortcut will use to run the application.
The Uninstall Information section is simple. If you want your installer to create an uninstaller, then leave CREATE_UNINSTALLdefined. When active, an uninstaller is placed in your application directory and information is added to the Add and Remove Programs control panel. Your user can either use the uninstaller directly or remove your application via the control panel. If you comment out this line, then no uninstaller is created and no information is added to the Add and Remove Programs control panel.
The Installer Graphics section can be used to customize the graphics that the installer displays. By default, the graphics use a modern, but generic, set of graphics. Add your own branding to the installer by pointing these values to your custom graphics. For examples of proper image sizes, browse the ${NSISDIR}\Contrib\Graphics directory. INSTALLER_ICON defines the icon the user sees when viewing the installer in explorer. WIZARD_BITMAP defines the left-side image on the welcome and finish pages.HEADER_BITMP defines the image that appears at the top of the other pages. Note that the template places the header image on the right, not the left.
The Uninstaller Graphics section customizes the uninstaller. Again, choose custom graphics that meet your needs or leave these commented out to use the template settings.
That’s it. You do not need to modify the rest of the template unless you need to add more custom functionality. We highly recommend exploring this template file to see how certain things are done. In particular, examine the Section block to see how files are added and installed. You might also find the onInit function of interest, since there is logic there to determine user permissions and the running version of Windows.
Hopefully, this template gets you off to a good start and provides you with a comprehensive example from which you can learn and build upon.
SRP RDK Template
This template file is SRP_Template_RDK.nsi. This file is more than 100 lines smaller than the previous template, revealing how plug-ins can truly simplify your work. Like the OI template, we’ll only concern ourselves with the Product Information section at the top. Here’s the RDK template version of that section:
#########################################################################################
# Product Information
#########################################################################################

; Product Information
!define PRODUCT_NAME                "My Utility"
!define PRODUCT_VERSION             "1.0"
!define PRODUCT_PUBLISHER           "My Company, Inc."
!define PRODUCT_WEB_SITE            "http://www.mycompany.com"

; Install Information
!define INSTALLER_NAME              "C:\MyInstalls\MyInstaller.exe"
!define SOURCE_RDK_DIRECTORY        "C:\MyRdkFolder"
!define DEFAULT_INSTALL_DIR         "C:\MyTargetFolder"
!define LICENSE_FILE                "C:\MyLicense.txt"
#!define CUSTOM_BRANDING            "My Catchy Phrase"

; Installer Graphics
#!define INSTALLER_ICON             "C:\MyIcons\MyInstall.ico"
#!define WIZARD_BITMAP              "C:\MyImages\MyWizard.bmp"
#!define HEADER_BITMAP              "C:\MyImages\MyHeader.bmp"

; Application Login Page Defaults
!define DEFAULT_APP_NAME            "SYSPROG"
!define DEFAULT_USERNAME            "SYSPROG"
!define DEFAULT_PASSWORD            ""

; If you plan to include a readme or help file, set it here
!define MUI_FINISHPAGE_SHOWREADME "$INSTDIR\MyReadme.txt"
NOTE: This code has been formatted to fit this document. The actual code includes detailed comments.
Some of the above definitions are identical to the ones in the SRP OI Template, so we’ll only discuss the ones unique to the SRP RDK Template.
In the second section, Install Information, the only definition unique to the SRP RDK Template is the SOURCE_RDK_DIRECTORY. It points to the RDK you wish to package and install. This definition must point to an existing and valid RDK directory.
The Application Login Page Defaults sets the default values for the three fields that appear on the Application Login Page. The Application Login Page is a custom page that requests the login credentials needed to log into OpenInsight. It even validates the login before allowing the user to continue. Explore the template to see how this custom page is implemented.
If your RDK includes a readme file, set the MUI_FINISHPAGE_SHOWREADME definition to the installed location of the readme. Doing so will cause the Finish page to allow the user to show the readme upon closing the installer. If you do not have a readme or do not wish to offer this option to the end user, then simply comment this line.
You might notice, unlike the OI template, that there is no uninstall or shortcut information. Installing RDKs is similar to updating an application, so creating an uninstaller is unintuitive. Furthermore, since RDKs install tools are embedded within OpenInsight, it doesn’t make sense to include shortcuts. However, if you have a need for either of these, feel free to experiment and modify the template to meet your needs.
Conclusion
We hope you’ve gained a deep knowledge of NSIS and how it can work for you. There is so much more to explore and learn, but you should have enough understanding to start writing your own installers. As you encounter questions, confusions, or dead-ends, consult the links in the References section. The NSIS wiki website and forums are the best avenue for finding answers. The community, thankfully, is very helpful and responsive.