Introduction
OpenInsight provides developers with many ways to create functionality that doesn’t come “right out of the box.” Unfortunately, some of these techniques often go undocumented. Creating custom events is one way to add wonderful features to an application. However, few developers consider them because they require the use of other features of OpenInsight that are equally neglected: the ability to capture Window’s messages and the use of promoted events.
This document will provide step-by-step instructions for implementing your own custom events. Specifically we will demonstrate how to create a right-click event for OpenInsight controls, including the edittable. While Window’s messages and promoted events will be discussed, some basic understanding of these areas is expected.
Getting Started
If you are already familiar with creating promoted events and capturing Windows messages then you can go straight to Putting It All Together.
Obviously the most important tool is a developer’s version of OpenInsight. Everything discussed in this document will work with OpenInsight v3.5 and later.
There are three general steps necessary to create a custom event and make sure it responds automatically:
- Create the custom event by using the EventDesigner tool.
- Identify the Windows message needed to trigger the custom event.
- Use a promoted CREATE and WINMSG event to handle all of the plumbing.
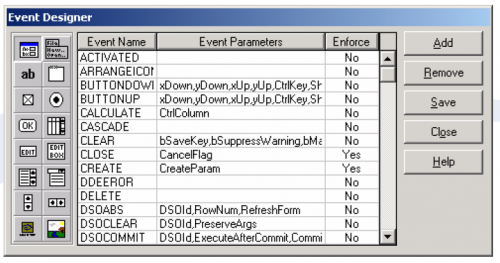
Accessing the EventDesigner can be done through the UI Workspace menu (Tools -> Design Events) or by running the EVENTDESIGNER window from the Application Manager:
Custom events are nothing more than convenient places to put programming logic unless they are triggered automatically by OpenInsight. This is where familiarity with Windows messages and how to capture them come in.
Applications are constantly receiving messages from the Windows operating system. These messages inform the application of a request (like “please shutdown”) or of an action (like “the letter ‘k’ was pressed”). These messages are identified uniquely by an ID number but are usually referenced in programming languages through equates (see the References section below). However, not every message is necessarily important to every application. Consequently messages can be ignored. In fact, all messages are ignored by default. Only those messages that applications are designed to listen for can do anything, and, in fact, it is up to the programmer to decide what the application will do when it receives that message.
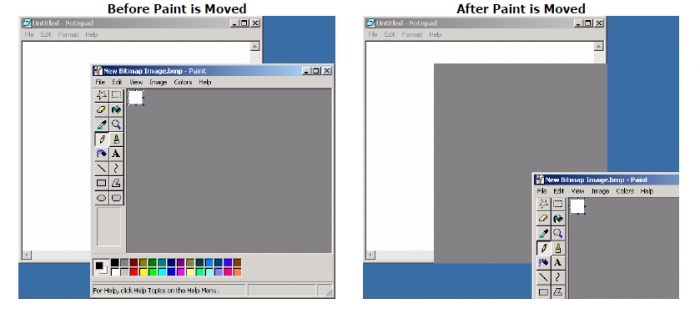
Fortunately, Revelation has built in many of the most critical Windows messages into OpenInsight so that our applications respond without any additional work on our part. For instance, whenever we move an application window around or drag one window over another a WM_PAINT (15 decimal, 0x000F hex) message is sent. This lets the application know that the desktop has changed in such a way that unless it redraws itself it will not look correct. For instance, here is a before-and-after example of what an application (the one in the background) will look like if the WM_PAINT message is ignored:
Many of these messages are turned into OpenInsight events so that the developer has a way to add additional logic to what OpenInsight will already do or, in some cases, replace it. For instance, when a letter on the keyboard is pressed a WM_CHAR message is generated (258 decimal, 0x0102 hex). Revelation listens for this message and in turn calls the CHAR event of the edit control which has focus. This allows the developer to add custom logic and create features like autofill.
Sometimes the developer needs more than the ability to add custom logic. Just because a request has been made, the application might be doing something very important that shouldn’t be interrupted. In these cases, the developer is allowed to use the event to replace (or simply precede) what OpenInsight would normally do. A common example is when an application receives the WM_CLOSE message (16 decimal, 0x0010 hex). When OpenInsight receives this message it calls the CLOSE event of the active window. A developer now has the ability to process logic before or instead of allowing OpenInsight to close the window.
There are hundreds of messages generated by Windows. Most of them are unimportant to the developer and therefore Revelation chose not to create an event for them. However, as developers and their applications become more advanced there are situations where listening for certain messages would be useful. Fortunately, Revelation has provided us a way to listen for messages so that we can hook on our own logic.
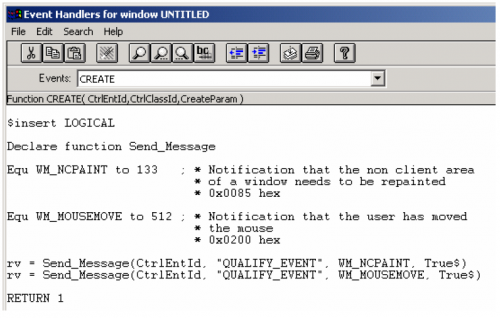
By using the QUALIFY_EVENT message (cf. Send_Message function) a developer can now capture specific Windows messages for a control or window (an OpenInsight window is a control for our purposes). This code is usually placed in the CREATE event of the window (or in the promoted CREATE event as we will demonstrate later):
When captured messages are received, OpenInsight makes a call to the WINMSG (“Windows message”) event for the relevant control. Within this event the actual message ID can be detected (which is important if multiple messages are being captured) so the appropriate logic gets executed:
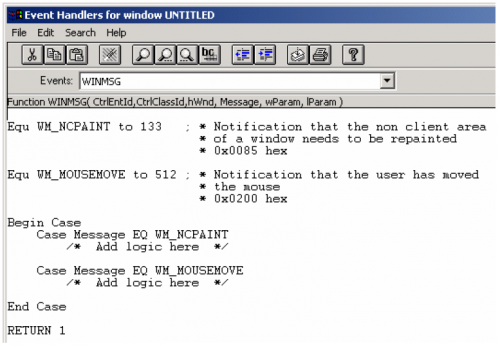
If you will notice, there are four parameters (in addition to the regular CtrlEntId and CtrlClassId) that are passed into the WINMSG event: hWnd, Message, wParam, and lParam. From the above example we see that the Windows message ID is passed through the Message parameter. wParam and lParam are also provided by Windows and contain additional information relevant to the Windows message being received. For example, the WM_MOUSEMOVE message by itself only tells OpenInsight that the mouse is moving over the window. In order know whether a button was clicked or where the mouse is exactly (i.e. X and Y position) one must look within the wParam and lParam parameters. However, binary algorithm must usually be applied against these values before the information is meaningful.
Once we have captured and processed logic for those Windows messages that we are interested in (and we know it works), we need to decide whether we want this new “feature” to be specific to certain windows only or available to all windows within the application. If it is the latter choice (and usually it is) then this is where promoted events come in handy.
If you are generally unfamiliar with promoted events then we highly encourage you to read Andrew McAuley’s The X Events article (see the References section below). This article has remained the standard primer on the subject and will provide a more general explanation than what will be discussed here.
Since capturing Windows messages uses both the CREATE and WINMSG event, it stands to reason that these events should be promoted (SRP recommends using promoted events for virtually everything). However, promoted events are notoriously difficult to maintain and debug. Therefore another recommendation is to design your promoted events so that they call a stored procedure to execute your logic. This is similar to having a symbolic dictionary call a stored procedure rather than storing the logic internally.
Here is what SRP uses to create their promoted CREATE event:
Compile function EXAMPLES_Create_OIwin(CtrlEntId, CtrlClassId, CreateParam)

$insert APP_INSERTS

Declare function Promoted_Events

/*

Enter the following into the Exec line whenever this event gets updated:

RUN COPY_ROW "SYSOBJ", "$EXAMPLES_CREATE_OIWIN*EXAMPLES", "SYSREPOSEVENTEXES", "EXAMPLES*CREATE..OIWIN*", "2"

*/

Return Promoted_Events(Create$, CtrlEntId, CtrlClassId, CreateParam)
A few notes on the above code:
- The name of the function is arbitrary. We use a name that is similar to the actual name of the promoted event for organizational purposes. You can use whatever name you wish as long as you put the correct name in the “RUN COPY_ROW” statement.
- APP_INSERTS contains the equates we use to assign our promoted events a numerical value for easy routing purposes. For instance, “Equ Create$ to 1”. See the References section for the full list.
- When the program is compiled, the “RUN COPY_ROW” statement should be copied to the Exec line of the System Editor and executed. This moves the appropriate object code for this function from the SYSOBJ table into the SYSREPOSEVENTEXES table. At this point the promoted event exists in your system.
- In our promoted events we call a “commuter module” function called Promoted_Events (an obvious name for obvious reasons.) Sample code for this function will be shown later. Remember, events are essentially functions (returning a 1 or 0) and therefore our Promoted_Events function returns a 1 or 0 to provide appropriate event chaining.
Our WINMSG event is promoted using a similar stored procedure:
Compile function EXAMPLES_WINMSG_OIwin(CtrlEntId, CtrlClassId, hWnd, Message, wParam, lParam)

$insert APP_INSERTS

Declare function Promoted_Events

 /*

Enter the following into the Exec line whenever this event gets updated:

RUN COPY_ROW "SYSOBJ", "$EXAMPLES_WINMSG_OIWIN*EXAMPLES", "SYSREPOSEVENTEXES", "EXAMPLES*WINMSG..OIWIN*", "2"

*/

Return Promoted_Events(Winmsg$, CtrlEntId, CtrlClassId, hWnd, Message, wParam, lParam)
Finally, our Promoted_Events function handles the logic that we previously had placed in separate event script code:
Compile function Promoted_Events(Instruction, CtrlEntId, CtrlClassId, Param1, Param2, Param3, Param4, Param5, Param6,
-> Param7, Param8)

 $insert APP_INSERTS
$insert LOGICAL

 Equ WM_NCPAINT to 133   ;       * Notification that the non client area
                               * of a window needs to be repainted
                               * 0x0085 hex

 Equ WM_MOUSEMOVE to 512 ;       * Notification that the user has moved
                               * the mouse
                               * 0x0200 hex

 Declare function Send_Message

 If Assigned(Param1) else Param1 = ""
If Assigned(Param2) else Param2 = ""
If Assigned(Param3) else Param3 = ""
If Assigned(Param4) else Param4 = ""
If Assigned(Param5) else Param5 = ""
If Assigned(Param6) else Param6 = ""
If Assigned(Param7) else Param7 = ""
If Assigned(Param8) else Param8 = ""

Window = Field(CtrlEntId, ".", 1)[1, "F*"]
Control = Field(CtrlEntId, ".", 2)

 *                      1 . . . . . 8 . . . . .
On Instruction GoSub CREATE . . . WINMSG . . .

 If Assigned(Ans) else Ans = 1

 Return Ans

CREATE:

   Transfer Param1 to CreateParam

   rv = Send_Message(CtrlEntId, "QUALIFY_EVENT", WM_NCPAINT, True$)
   rv = Send_Message(CtrlEntId, "QUALIFY_EVENT", WM_MOUSEMOVE, True$)

 return

WINMSG:

   Transfer Param1 to hWnd
   Transfer Param2 to Message
   Transfer Param3 to wParam
   Transfer Param4 to lParam

       Begin Case

           Case Message EQ WM_NCPAINT
               /* Add logic here */

           Case Message EQ WM_MOUSEMOVE
               /* Add logic here */

       End Case

 return
As should be evident, this “commuter module” approach towards managing promoted event logic offers many advantages to developers. Changes can be made rather quickly and logic can be debugged easily. Another benefit is the ability to see different event’s code in one place. This is helpful, especially in our code above, where the contents of one event are directly linked to another.
With these basic components under our belt we are now ready to create a functional custom event.
Putting It All Together
One custom event that we use often is RightClickUp. Normally we use this event to implement context menus for our controls, especially edittables. In fact, one could easily create a ContextMenu event (in lieu of or in addition to the RightClickUp event) using the same steps. Since RightClickUp is a more generic reference we will stick with this name and let you decide what to do with the event yourself.
Our first step is to create the event using the EventDesigner tool. This part is easy. Clicking the “Add” button will bring up a message box where you enter the name of the event:
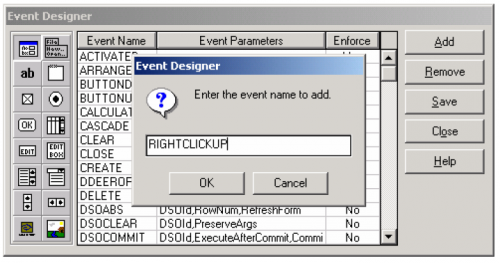
OpenInsight will ask you to confirm this action, so make sure you click “Yes” when prompted. Then your new event class will be in place (scroll down to see it since events are stored in alphabetical order):
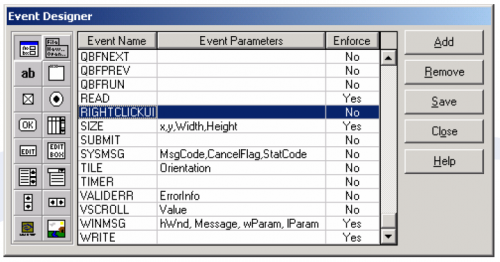
However, there are no “Event Parameters” entered for our custom event. Obviously OpenInsight doesn’t know what these should be so we need to edit the cell and add our own. These can be named anything we want but they should be meaningful and we should also be certain that whatever information they should contain is within our ability to provide.
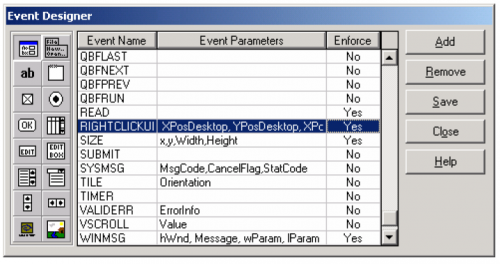
For our RightClickUp event we will use the following parameters:
| XPosDesktop | The X-position of the cursor relative to the upper left corner of the desktop |
| YPosDesktop | The Y-position of the cursor relative to the upper left corner of the desktop |
| CPosControl | The X-position of the cursor relative to the upper left corner of the current control |
| YPosControl | The X-position of the cursor relative to the upper left corner of the current control |
Finally, if you plan on promoting your new custom event (something we highly recommend you do), then you need to change the “Enforce” flag from “No” to “Yes”. When everything is done your EventDesigner window should look like this:
One last comment before we leave the EventDesigner tool. Our custom event needs to be created for each control that needs this functionality. So far all we have done is create a RightClickUp event for the Window control. In order to enable this event for other controls we need to select the appropriate control using the control palette on the left and repeat the above steps.
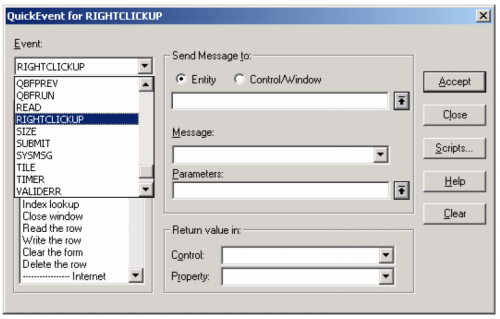
Our event is now officially recognized by OpenInsight. To confirm this, just open a window in the Form Designer, go to the Event editor (or QuickEvent dialog) and list the available events. You should see an entry for RIGHTCLICKUP:
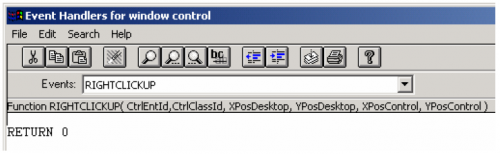
If you go into the Script editor for this event you will see the event and all of the parameters that were defined with the EventDesigner (pretty cool huh?):
Of course at this point our custom event is merely a place to put our code, similar to the OMNIEVENT. It is up to the developer to actually call this event. This is where our knowledge of Window’s messages comes in handy.
As it turns out, there are several ways to detect if the end user is right-clicking their mouse. If we look through our list of Window’s messages we see a WM_RBUTTONUP (517 decimal, 0x0205 hex) message that would appear to do the job very nicely. Unfortunately, the edittable control does not respond to (or, more accurately, does not pass through) this specific message. Therefore, an alternative message must be found.
Fortunately other messages will work with edittables. SRP prefers to use WM_SETCURSOR (32 decimal, 0x0020 hex). This message is a “notification that the mouse cursor is moving within a window”. However, the lParam parameter will also tell us which, if any, mouse buttons were being clicked at the same time.
So now we need to modify our promoted CREATE event (refer to Getting Started above to see how SRP manages promoted events) so that this message is captured for all controls (including the window):
CREATE:
   Send_Message(@Window, "QUALIFY_EVENT", "0x0020", 1)
   Ctrls = Get_Property(@Window, "CTRLMAP")
   NumCtrls = Count(Ctrls, @FM) + (Ctrls NE "")
   For Loop = 1 to NumCtrls
       Send_Message(Ctrls<Loop>, "QUALIFY_EVENT", "0x0020", 1)
   Next Loop
Return
However, if we leave the code “as is” then we will have to add logic to the WINMSG event of every window and control that needs this functionality. An ideal solution would be to route each control’s local WINMSG event to a common, i.e. promoted, WINMSG event. Again, we’ll use the QUALIFY_EVENT message to accomplish this. Note the changes (in bold) to our promoted CREATE event code below:
CREATE:
   Transfer Param1 to CreateParam

   Send_Message(@Window, "QUALIFY_EVENT", "0x0020", 1)
   Send_Message(@Window, "QUALIFY_EVENT", "WINMSG", 1:@FM:6:"*":@APPID<1>:"*WINMSG..OIWIN*")
   Ctrls = Get_Property(@Window, "CTRLMAP")
   NumCtrls = Count(Ctrls, @FM) + (Ctrls NE "")
   For Loop = 1 to NumCtrls
       Send_Message(Ctrls<Loop>, "QUALIFY_EVENT", "0x0020", 1)
       Send_Message(Ctrls<Loop>, "QUALIFY_EVENT", "WINMSG", 1:@FM:6:"*":@APPID<1>:"*WINMSG..OIWIN*")
   Next Loop
Return
QUALIFY_EVENT has two purposes: first, to capture a Window’s message for use in an OpenInsight application, and second, to route one event to another. In the two lines we added above, we are telling OpenInsight to route each control’s local WINMSG event to our promoted WINMSG event. This allows us to manage all of our Windows message logic in a single place.
Perhaps you are wondering, “Why not use QUALIFY_EVENT to route these local WINMSG events to local (or promoted) RIGHTCLICKUP events?” Good question. There are two answers. First, because WM_SETCURSOR only means that the mouse isbeing used, it doesn’t automatically mean that any buttons were clicked. Second, if multiple Window’s messages are being captured you will want to use the WINMSG event to branch out accordingly. Therefore, our WINMSG will start out looking like this:
WINMSG:
   Transfer Param1 to hWnd
   Transfer Param2 to Message
   Transfer Param3 to wParam
   Transfer Param4 to lParam

   Begin Case

       Case Message EQ WM_SETCURSOR ; * 32 decimal, 0x0020 hex
           /* Add logic here */

   End Case

 Return
As previously mentioned, the WM_SETCURSOR message is sent whenever the mouse is being used. Therefore we must use one of the special parameters (lParam in this case) to determine exactly what is happening with the mouse. lParam is a double-word in which the high-order word contains the message ID (i.e. WM_LBUTTONUP, WM_RBUTTONUP, etc.) of the specific mouse action. If this doesn’t make sense then don’t worry, just review the changes to our promoted WINMSG event:
WINMSG:
   Transfer Param1 to hWnd
   Transfer Param2 to Message
   Transfer Param3 to wParam
   Transfer Param4 to lParam

   Begin Case

       Case Message EQ WM_SETCURSOR ; * 32 decimal, 0x0020 hex
           /* Mouse activity is happening */

       MouseMessage = Int(lParam / 65536) ; * Check to see if a mouse button was pressed

       Begin Case
           Case MouseMessage EQ WM_LBUTTONDOWN
               /* Left mouse button is down */

           Case MouseMessage EQ WM_LBUTTONUP
               /* Left mouse button is up */

           Case MouseMessage EQ WM_RBUTTONDOWN
               /* Right mouse button is down */

           Case MouseMessage EQ WM_RBUTTONUP
               /* Right mouse button is up */

           Case 1
               /* Mouse is moving */

       End Case

   End Case

 Return
From this point we can create custom handling of other mouse activity very easily. But for now we will stay focused on our RightClickUp event. Before we can do this, however, we need to add logic that tells us where our mouse position is. See below for how this is done (for readability, we have removed the non-relevant mouse message statements.):
WINMSG:
   Transfer Param1 to hWnd
   Transfer Param2 to Message
   Transfer Param3 to wParam
   Transfer Param4 to lParam

   Begin Case
       Case Message EQ WM_SETCURSOR ; * 32 decimal, 0x0020 hex
           /* Mouse activity is happening */

           MouseMessage = Int(lParam / 65536) ; * Check to see if a mouse button was pressed
           Begin Case
               Case MouseMessage EQ WM_RBUTTONUP
                   /* Right mouse button is up */

                   MousePos = Blank_Struct("POINT")
                   rv = GetCursorPos(MousePos)
                   XYDesktop = Struct_To_Var(MousePos, "POINT")
                   hWnd = Get_Property(CtrlEntId, "HANDLE")
                   rv = ScreenToClient(hWnd, MousePos)
                   XYControl = Struct_To_Var(MousePos, "POINT")
                   XPosDesktop = XYDesktop<1>
                   YPosDesktop = XYDesktop<2>
                   XPosControl = XYControl<1>
                   YPosControl = XYControl<2>
           End Case

   End Case

 Return
We will not spend time in this document to explain everything that was just added above. That is a subject for another write up. However, 16-bit versions of OpenInsight do not have the ScreenToClient function. This Window’s API function must be added by editing the DLL_USER record in SYSPROCS or by creating your own record (done from the SYSPROG application). Its contents should look like this:
USER
VOID PASCAL ScreenToClient(USHORT, LPCHAR)
Once this has been created, enter the following from the System Editor’s Exec line:
RUN DECLARE_FCNS “DLL_USER”
If you don’t use the DLL_USER record then replace the name in the above command with the actual record name that you will use.
Now we are ready to make our final connection by using this captured right-click message and the calculated position of the mouse cursor to call our RightClickUp event. Then we will finally have a true custom event that launches automatically. Fortunately OpenInsight provides two functions that allows developers a way for calling events from within a stored procedure: Send_Event and Post_Event.
Either one can be used, but depending on the nature of your event one may be more appropriate than the other. Send_Event tells OpenInsight to call the event as soon as possible (i.e. it puts it next in call stack to be processed). Post_Event tells OpenInsight to call the event after all other items currently in the call stack have been processed. For our purposes we use Send_Event, as demonstrated below:
WINMSG:
   Transfer Param1 to hWnd
   Transfer Param2 to Message
   Transfer Param3 to wParam
   Transfer Param4 to lParam

   Begin Case
       Case Message EQ WM_SETCURSOR ; * 32 decimal, 0x0020 hex
           /* Mouse activity is happening */

           MouseMessage = Int(lParam / 65536) ; * Check to see if a mouse button was pressed
           Begin Case
               Case MouseMessage EQ WM_RBUTTONUP
                   /* Right mouse button is up */

                   MousePos = Blank_Struct("POINT")
                   rv = GetCursorPos(MousePos)
                   XYDesktop = Struct_To_Var(MousePos, "POINT")
                   hWnd = Get_Property(CtrlEntId, "HANDLE")
                   rv = ScreenToClient(hWnd, MousePos)
                   XYControl = Struct_To_Var(MousePos, "POINT")
                   XPosDesktop = XYDesktop<1>
                   YPosDesktop = XYDesktop<2>
                   XPosControl = XYControl<1>
                   YPosControl = XYControl<2>

                   rv = Send_Event(CtrlEntId, "RIGHTCLICKUP", XPosDesktop, YPosDesktop, XPosControl,
                   -> YPosControl)
           End Case
   End Case
Return
If you develop multiple applications with the same copy of OpenInsight we suggest putting your promoted events in the SYSPROG application. This will allow all inherited applications to benefit without having to replicate your logic for each application.
Our final step is to make it possible to deploy our custom events. Since promoted events are not identified within OpenInsight’s repository, like control-specific events are, we must create our own repository pointer. We begin by selecting the Application Manager’s Entity -> New menu:
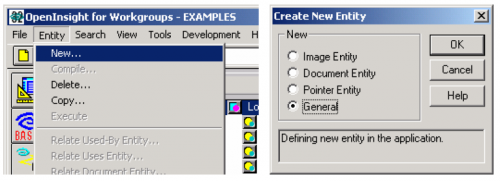
Click on the OK button and the New Entity dialog box will appear. Double-click on the Application Rows line in the entity name listbox:
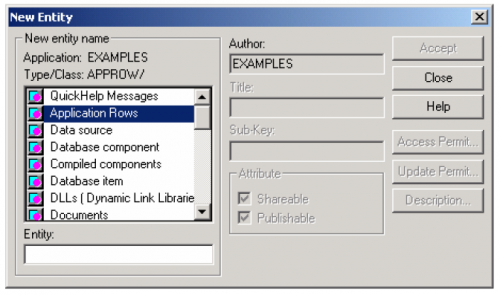
Application Rows are generic pointers that allow the developer to create a repository entity for any record in any table. Therefore, they are useful for more than deploying promoted events. All that we need is to enter in the correct naming conventions that OpenInsight expects:
| Entity | Table:KeyID (Note, if KeyID is a multi-part key then use an underscore instead of an asterisks.) |
| Title | Anything descriptive about this entity. |
| Sub-Key | KeyID (This KeyID should be the true KeyID of the record, including asterisks.) |
For our RightClickUp event we entered the following:
| Entity | SYSREPOSEVENTEXES:EXAMPLES_RIGHTCLICKUP..OIWIN_ |
| Title | Promoted Right-Click Up Event |
| Sub-Key | EXAMPLES*RIGHTCLICKUP..OIWIN* |

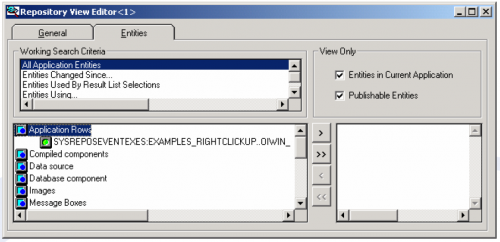
Now we can use the deployment tool of our choice (e.g. RDK or Check-Out) to distribute our promoted event:
Congratulations, you now have a custom event that works like an “out of the box” OpenInsight event! Even though it took some work to get here, most of the ground work is in place for future custom events that you may want to consider (especially if they are mouse related). Whatever your imagination can think of, we hope that this has been a helpful and informative document.
References
Further information we think will be helpful are listed here for your convenience:
1. Documentation on Window’s messages is usually available through a Microsoft Windows Software Developer’s Kit (SDK). This would include Microsoft C++, Microsoft Visual Basic, and Borland Delphi. Information can also be found within independent Windows API books. Our library has The Waite Group's Windows API Bible (now out of print) and Windows NT Win32 SuperBible. There are many others available as well as plenty of online material. Here is a list of those that SRP uses:
| Equ WM_CLOSE | to 16 ; * 0x0010 |
| Equ WM_SYSCOLORCHANGE | to 21 ; * 0x0015 |
| Equ WM_SETCURSOR | to 32 ; * 0x0020 |
| Equ WM_COMMAND | to 273 ; * 0x0111 |
| Equ WM_LBUTTONDOWN | to 513 ; * 0x0201 |
| Equ WM_LBUTTONUP | to 514 ; * 0x0202 |
| Equ WM_LBUTTONDBLCLK | to 515 ; * 0x0203 |
| Equ WM_RBUTTONDOWN | to 516 ; * 0x0204 |
| Equ WM_RBUTTONUP | to 517 ; * 0x0205 |
| Equ WM_USER | to 1024 ; * 0x0400 |
2. The X Events by Andrew P. McAuley can be found in Sprezzatura’s Electronic Newsletter (S/ENL) Volume 1, Issue 7.
Here is a direct link to this article: http://www.sprezzatura.com/senl/senl17.htm#_Toc447357930
3. SRP promotes several events and uses the Promoted_Events function to manage them all in one place. Here is the full list of equates that we use:
| Equ Create$ | to 1 |
| Equ Activated$ | to 2 |
| Equ Read_Pre_System$ | to 3 |
| Equ Clear_Post_System$ | to 4 |
| Equ Close_Post_System$ | to 5 |
| Equ Size$ | to 6 |
| Equ Delete_Post_System$ | to 7 |
| Equ Winmsg$ | to 8 |
| Equ Write_Pre_System$ | to 9 |
| Equ Gotfocus$ | to 10 |
| Equ Lostfocus$ | to 11 |
| Equ Inactivated$ | to 12 |
| Equ Read_Post_System$ | to 13 |
| Equ Clear_Pre_System$ | to 14 |
| Equ Poschanged$ | to 15 |
| Equ Close_Pre_System$ | to 16 |
| Equ Write_Post_System$ | to 17 |
| Equ Delete_Pre_System$ | to 18 |
| Equ InsertRow$ | to 19 |
| Equ DeleteRow$ | to 20 |
| Equ ColSize$ | to 21 |
| Equ RightClickUp$ | to 22 |
| Equ MouseOver$ | to 23 |
| Equ MouseOff$ | to 24 |
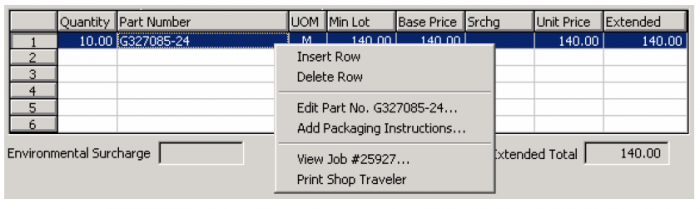
4. Now that you have a RightClickUp event, you need to think of something for it to do. Implementing a Context Menu is a wonderful feature to add to your application. With them you can offer control-specific menu functions, such as what this screen shot shows:
Revelation Software has a Creating context menus article in the Knowledge Base section of their website. Here is a direct link to this article: http://www.revelation.com/knowledge.nsf/d77dcc92cb73ae6b852566f500657e9d/d0edb4df752b6fb8852563b9005f7e03?OpenDocument