Introduction
SRP FrameWorks is designed to provide a recognizable and intuitive interface for OpenInsight applications. It's MDI Frame architecture takes advantage of SRP OLE controls to present a professional front-end that looks and behaves like many modern Windows® based business applications.
Because SRP FrameWorks uses promoted events and commuter modules as a foundation, development and maintenance of your application will remain relatively easy…even as the system grows and becomes more complex.
As with any application, forms (aka windows) are the key element that allows the end user to interact with the environment. Therefore, the following is an outline of how a standard form should be created and added to SRP FrameWorks in order to take advantage of its built-in features.
Step #1 - Design the Form in Form Designer
Use the Form Designer to create your form in the normal fashion. We have provided a tool to help you get started with a fully function form and commuter module - SRP Form Copy:
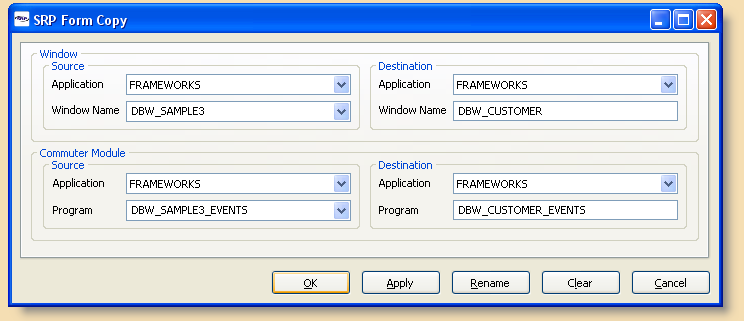
This will create a copy of an existing form and commuter module so you can modify rather than create from scratch. SRP FrameWorks ships with a "blank slate" form, DBW_SAMPLE3, that can be useful until more fully functional forms have been developed.
While Script Event and traditional QuickEvent handlers will work, SRP FrameWorks is designed to take advantage of Promoted Events. If a commuter module uses the correct naming convention (see below) then the promoted events will automatically call a form's commuter module automatically, both for pre and post-System Event handling. Therefore, this eliminates the need for Script Events handlers which are difficult to maintain and the need for QuickEvent handlers which can only be added or modified from within the Form Designer. Our approach allows virtually all event management to be controlled through the System Editor.
While the name of the form is not critical, the name of your commuter module should conform to our standard. Commuter modules should be named as such:
FormName_EVENTS
Furthermore, your parameter heading should always look like this:
Function FormName_EVENTS(CtrlEntId, Event, Param1, Param2, Param3. . .Param15)
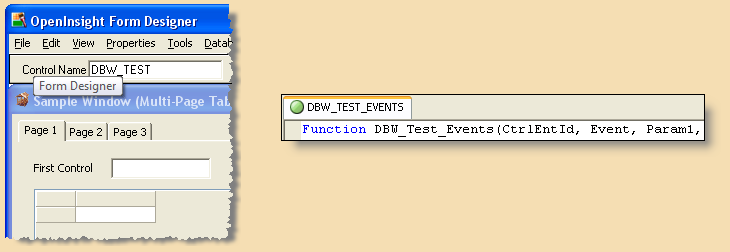
As previously mentioned, a sample form and commuter module skeleton have been included (DBW_SAMPLE3 and DBW_SAMPLE3_EVENTS) to give you a good starting point for new forms. Using the SRP Form Copy utility we will create a new form called DBW_TEST. It will serve as our example for the rest of this document:
Keep in mind that most SRP FrameWorks forms will be MDI Child forms. Although MDI Child forms can have their own menu, this menu automatically becomes the menu for the MDI Frame (i.e. FRW_MAIN) when the MDI Child becomes active. If you choose to create a menu for any MDI Child forms then you will need to recreate all of the normal menu functionality that would normally be provided by FRW_MAIN. Because of the additional work that this provides, we strongly recommend creating MDI Child forms without any menus and take advantage of the menu in the MDI Frame (which is the way FRW_MAIN was designed to work.)
Step #2 - Add the Form to the MDI Frame (FW_MAIN)
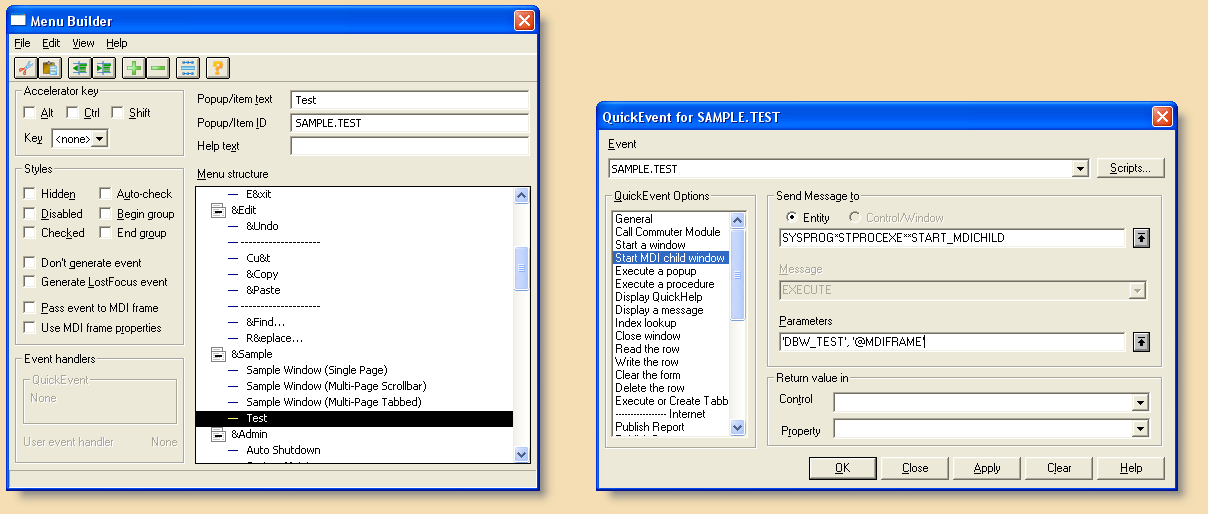
There are three ways that a form can be launched from within SRP FrameWorks. First, you can use the Menu Designer from within the Form Designer to add menu items that will launch your form. You can use the menu QuickEvent dialog box to create an option that launches an MDI Child form or you can call a stored procedure (e.g. FRW_MAIN_EVENTS) to handle the launching of the MDI Child for you:
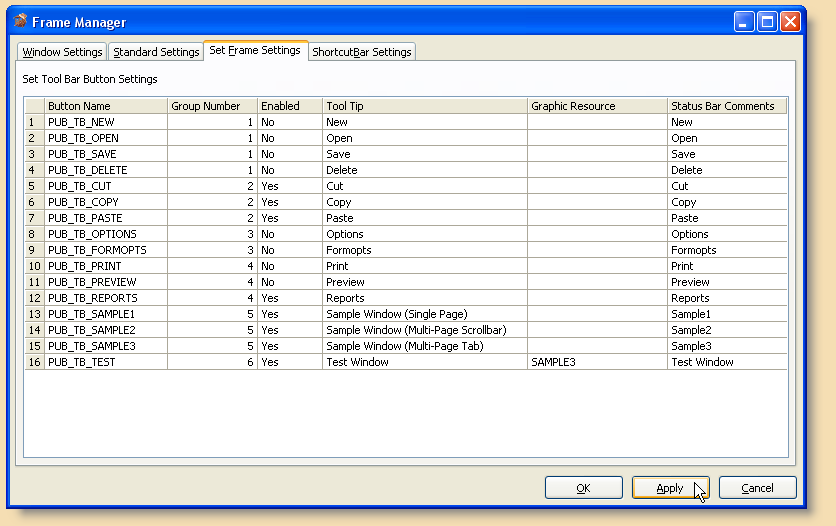
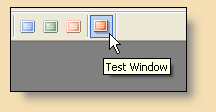
The second method to launch your MDI Child form would be to add another toolbar button. SRP FrameWorks automatically comes with three buttons in the toolbar that launch three included sample forms. These can be removed, modified, or added onto with new buttons. Use the Frame Manager tool to configure how the buttons appear:
In our example, another ActiveX button was added to FRW_MAIN using the Form Designer. It does not matter where the button was placed or what size it is. The Frame Manager automatically configures the toolbar for you based on the information you provide. When FRW_MAIN is launched, the new button appears in the toolbar:
All that is needed now are the necessary sections of code within the FRW_MAIN_EVENTS commuter module that will launch this form. Here is what the Case statement might look like:
Case Control EQ "PUB_TB_TEST" ; GoSub CLICK.PUB_TB_TEST
Here is what the specific gosub section might look like:
CLICK.PUB_TB_TEST:
   Child = Start_MDIChild("DBW_TEST", @Window)
return
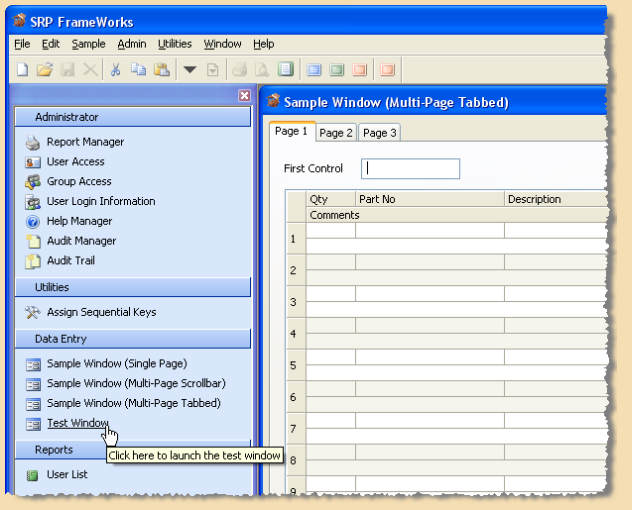
The third method for launching an MDI Child is to use the Shortcut Bar control. Again, the Frame Manager is used to configure this:
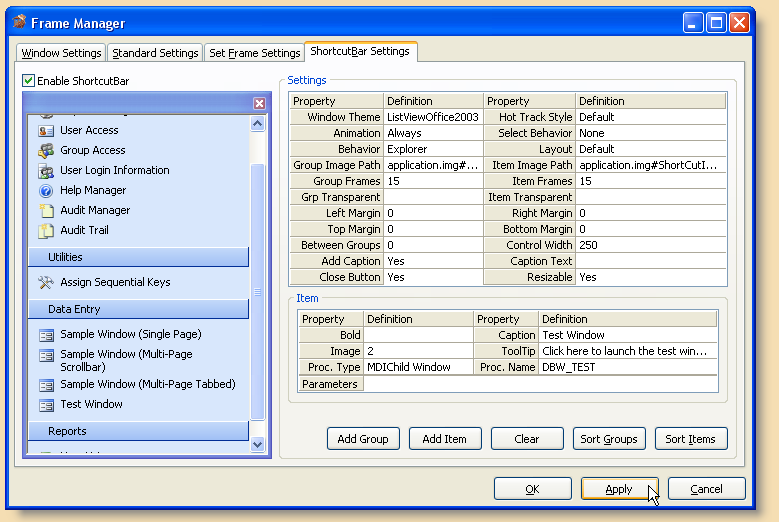
With no additional coding necessary, this item will be automatically functional for the end user when the application is launched:
Step #3 - Configure the Toolbar Buttons with the Frame Manager
In order to provide a richer user interface experience, SRP FrameWorks was designed to enable and disable relevant menu items and toolbar buttons based on the status of the active MDI Child form. For instance, it would not make sense to have the Save or Delete buttons enabled if there were no MDI Child forms open or if the active form didn't have a record loaded. This is another feature that the Frame Manager was designed to configure:
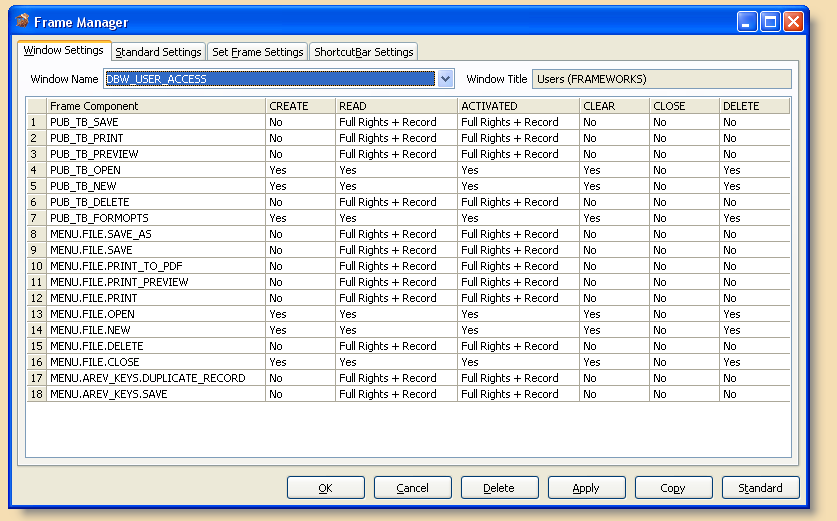
This utility allows you to select any form within the local or inherited applications. The first column identifies which menu and toolbar buttons you want to be controlled through the Frame Manager. All the other columns represent the settings you wish to apply based on the corresponding event. Here are the available settings:
| Setting | Meaning |
|---|---|
| Full Write | The end user must have full security access to this form (see User Access below) in order for the relevant menu item or toolbar button to be enabled. |
| Full Write + Record | Same as 'Full Write' but the form must have a record loaded and locked as well. This would be a common setting for the Save button. |
| Full Write + Record (L/U) | Same as 'Full Write' but the form must have a record loaded as well. The record can be locked or unlocked. This would be a common setting for the Print button. |
| Yes | Unconditionally set the relevant menu item or toolbar button to be enabled. |
| Yes + Record | Same as 'Yes' but the form must have a record loaded and locked as well. |
| Yes + Record (L/U) | Same as 'Yes' but the form must have a record loaded as well. The record can be locked or unlocked. |
| No | Unconditionally set the relevant menu item or toolbar button to be disabled. |
| Commuter | The active form's commuter module will be executed (if one exists) with special event names (FM_CREATE, FM_READ, FM_ACTIVATED, FM_CLEAR, FM_CLOSE, and FM_DELETE) to allow the developer to provide customized logic. Please note that it is necessary for the naming convention of FormName_EVENTS to be used for this to work. |
The Standard Settings tab allows you to create a default template for your forms. All forms that do not have their own settings will automatically use these settings. Additionally, if you bring up a form in the Window Settings tab and click on the Standard button, it will copy those settings for the form which can then be modified as necessary.
Step #4 - Add the Form to the Security Manager
Security in SRP FrameWorks is primarily handled by defining Group profiles. Within each Group, levels of access are assigned to each form, report, toolbar button, shortcut item, and menu item. Optionally, even access to specific controls within a form can be managed.
Application users are then assigned to a particular Group. Once assigned to a Group, a User has the same levels of access as defined in that Group. However, if desired, a user's access level can be overridden for specific items.
Items must first be registered in the Security Manager utility. To launch this utility just run the form DBW_SECURITY_MANAGER:
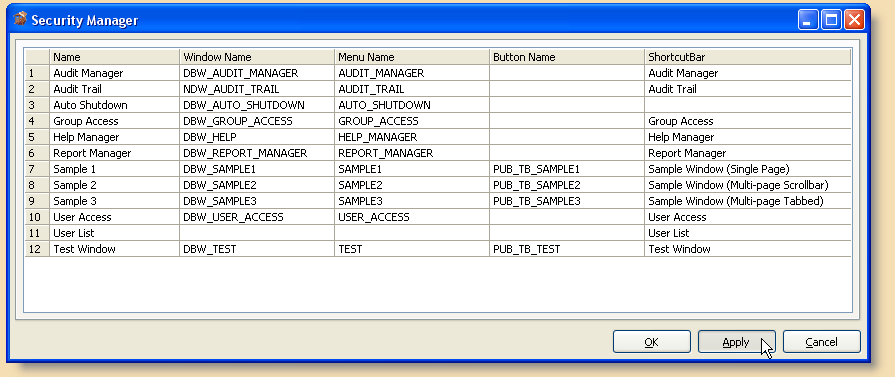
Each column is then populated with the appropriate information as described in this chart:
| Column | Description |
|---|---|
| Name | This is the user friendly name that will display in the Group and User Access forms. |
| Window Name | This is the entity name of the form (window) that is being registered in the Security Manager. |
| Menu Name | This is the entity name of the menu item in FRW_MAIN that is being registered in the Security Manager. |
| Button Name | This is the entity name of the toolbar button in FRW_MAIN that is being registered in the Security Manager. |
| ShortcutBar | This is the name of the Shortcut Bar item in FRW_MAIN that is being registered in the Security Manager. |
Because OpenInsight does not have a way of tracking the relationships between forms and any menu items or toolbar buttons that are used to launch them, it is important that the developer adds these menu and/or toolbar buttons from each form. This will allow the security management system to properly allow or deny access to all visible ways of launching the form.
If a menu or toolbar button is accidentally omitted from the Security Manager, and the end user launches a form, data changes will still be prevented. This is because the promoted WRITE and DELETE event handlers make a redundant check to see if the user has the property security access to the form itself.
It should be noted that the Security Manager can also be used to allow or deny access to menu items and toolbar buttons that are not connected to a form. For instance, perhaps there is a menu item that executes a stored procedure or a report. These types of application elements also need security control, which is done by simply adding the menu or toolbar button name and leaving the Window Name cell empty.
Since menu items can be access points for sub-menus (these are called top-level menus), an entire menu tree can be made available or protected from access without the need to register each menu item in the tree. Just register the top-level menu name and grant the appropriate level of access to it.
Step #5 - Add the Form to the Group Access Settings
After a component has been added to the Security Manager it is now available to the Group Access form (which is launched from within FRW_MAIN):
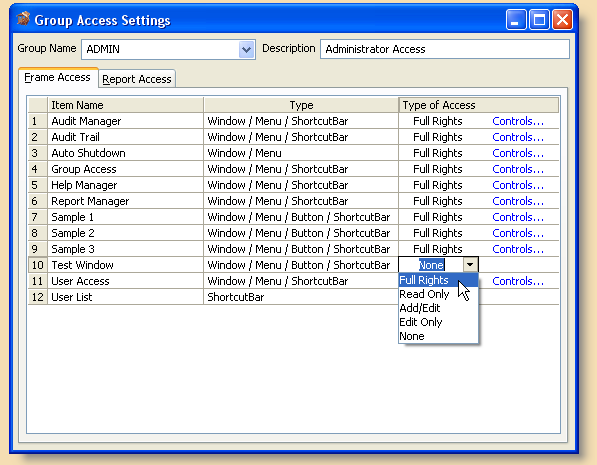
This image shows the built-in ADMIN group access profile. By default it has access to all components which have been pre-registered in the Security Manager. However, there is no access to Test Window since it was just registered to through the Security Manager. This means that any users with the ADMIN group access profile will not yet have access to this item. By default, Groups do not have access to new items registered in the Security Manager. To give the user access to this item just click on the dropdown button and select the desired access type:
| Type of Access | Description |
|---|---|
| Full Rights | User has complete access to this item. If this is a form, the user has the ability to create, read, modify, and delete records. |
| Read Only | User can see but does not have access this item. If this is a form, the user has the ability to read records but not create, modify, or delete them. |
| Add/Edit | User can create, read, and modify records but not delete them. (Applicable to forms only) |
| Edit Only | User can read and modify records but not create or delete them. (Applicable to forms only) |
| None | User does not have any access to this item. Menus, buttons, and shortcut items will be invisible. |
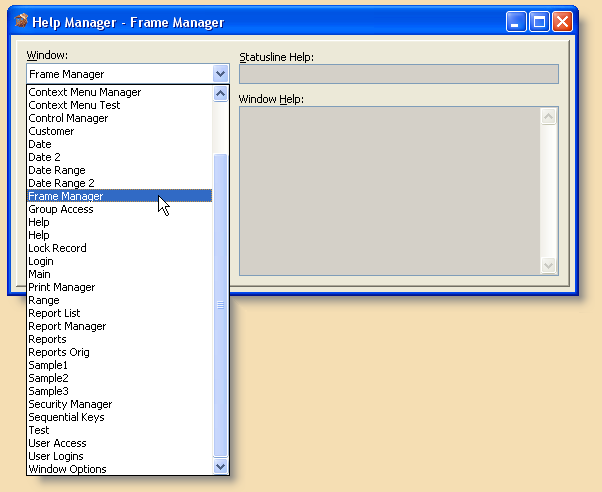
Step #6 - Additional Features: Help Manager, Window Options (a.k.a. Softkeys)
You can use the Help Manager to easily create statusline and context sensitive help for your form and prompts. This form is designed to run from with FRW_MAIN so that end users can be given access it it. This is helpful if end users are used to document the system as they use it:
Options for the entire form (a.k.a. SoftKeys in AREV) can be added using the Window Options utility. This will provide you the ability to assign functionality to most Alt+Function Key and Shift+Function Key accelerator combinations:
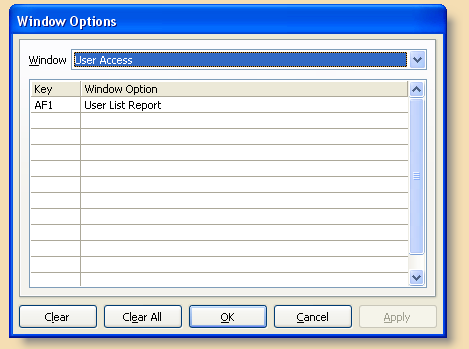
In the commuter module for DBW_SAMPLE3 there is skeleton code for a "FORMOPTS" event. This really isn't an event but the commuter module is called as if it were. Here is where functionality can be assigned for each accelerator.
This code snippet shows how the case logic should appear in the commuter module:
 Case Control EQ Window
   // This event is window specific.

   Begin Case
       Case Event EQ "CREATE"              ; GoSub CREATE
       Case Event EQ "VSCROLL"             ; GoSub VSCROLL
       Case Event EQ "FORMOPTS"            ; GoSub FORMOPTS
Here is a copy of the FORMOPTS gosub section as it appears in the DBW_SAMPLE3 commuter module:
FORMOPTS:
    // A type of SoftKey feature is available for all forms. First run the
    // NDW_WINDOW_OPTIONS form, select a window, then add the softkey accelerator
    // keys and descriptions. These will automatically appear in a popup when the
    // user presses F6 or clicks on the Form Options button on the MDI Frame
    // toolbar. If the end user selects an option from the popup or presses the
    // appropriate accelerator keys then a special FORMOPTS event will be sent to
    // the window's commuter module with the accelerator passed into Param1.
    // It is up to the commuter to provide functionality (unlike AREV which
    // offered a Code and Command prompt in the SoftKey definition form.
    // @Window will always be the MDIFrame so the active MDI Child needs to
    // be identified.
    Window = Get_Property(@Window, "MDIACTIVE")
    Softkey = Param1
    If SoftKey EQ "F6" then
        TypeOverride = ""
        TypeOverride<8> = Get_Property(Window, "@FORM_OPTIONS")
        TypeOverRide<28> = 1 ; // Select and highlight 1st
        SoftKey = PopUp(@Window, TypeOverride, "WINDOW_OPTS")
    end

    Begin Case
        Case SoftKey EQ "AF1"
            // User pressed Alt-F1
            Msg(@Window, "User pressed Alt-F1")

        Case SoftKey EQ "AF2"
            // User pressed Alt-F2
            Msg(@Window, "User pressed Alt-F2")

        Case SoftKey EQ "SF1"
            // User pressed Shift-F1
            Msg(@Window, "User pressed Shift-F1")

        Case SoftKey EQ "SF2"
            // User pressed Shift-F2
            Msg(@Window, "User pressed Shift-F2")

    End Case
return