The control's border alignment
Usage
Set_Property(OLECtrlEntID, "OLE.BorderAlignment", StringValue)
Values
StringValue can be any string meeting the following format requirements:
Syntax: See Remarks
Default: "None"
Remarks
The BorderAlignment property is used to draw a picture's border at various locations within the control. This provides an ability to use multiple picture controls on an OI form as border pieces. For example, you may want to surround a group of controls on three sides with a sunken beveled edge.
If you have an SRP Tab control, you can use the picture control to complete the tab control's borders.
This property is a formatted string, that is, it expects specific values in a specific format. Primarily, this property can be set to any combination of the following four values:
| Value | Abbr. | Description |
|---|---|---|
| Left | L | Draws the border along the left edge of the control |
| Right | R | Draws the border along the right edge of the control |
| Top | T | Draws the border along the top edge of the control |
| Bottom | B | Draws the border along the bottom edge of the control |
Simply set this property to a string containing any above value (or abbreviation thereof) separated by spaces. Order is not important. For instance, the following string draws the border along three edges:
* 2 ways to set the border along the bottom edge and both side edges
Set_Property(@Window:".OLE_PICTURE", "OLE.BorderAlignment", "Left Right Bottom")
Set_Property(@Window:".OLE_PICTURE", "OLE.BorderAlignment", "L R B"

To quickly remove or add all border edges at once, set the BorderAlignment to one of the following values:
| Value | Description |
|---|---|
| All | Draws the border along all edges of the control |
| None | Draws no border |
For either on of the above values to work, they must be the first and only value specified. The following example demonstrates an invalid use of these values followed by a valid one.
* Since "None" is not the first word, it is ignored. Thus, only the left border is drawn
Set_Property(@Window:".OLE_PICTURE", "OLE.BorderAlignment", "Left None")

* In this case, "None" works and no border is drawn
Set_Property(@Window:".OLE_PICTURE", "OLE.BorderAlignment", "None" )
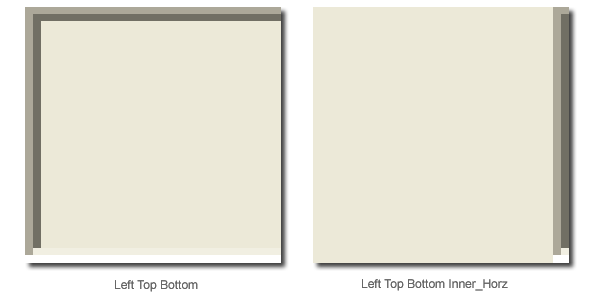
Finally, there may be cases when you want a left border to be drawn on the right side, or inner side, of the control. This is meant to compensate for the 7-pixel minimum imposed by the OI Form Designer. With the following values, you can move a border to the opposite edge for more control over the spacing between the picture control border and other OI controls:
| Value | Abbr. | Description |
|---|---|---|
| Inner_Horz | IH | If "Left" is included, then the left border is pushed to the right side of the control. If "Right" is included, then the right border is pushed to the left side of the control. If both "Left" and "Right" are included, then this value is ignored |
| Inner_Vert | IV | If "Top" is included, then the top border is pushed to the bottom of the control. If "Bottom" is included, then the bottom border is pushed to the top of the control. If both "Top" and "Bottom" are included, then this value is ignored |
| Inner_Both | IB | Same as specifying both "Inner_Vert" and "Inner_Horz" |
As noted in the table, these values only make sense as long as you apply them to only one of the two applicable edges. You cannot ask both a "Left" and "Right" border to move to the opposite edges because one edge will be lost. The following example demonstrates the proper usage of the above values:
* In this case, "Inner_Horz" is ignored because both "Left" and "Right" are specified
Set_Property(@Window:".OLE_PICTURE", "OLE.BorderAlignment", "Left Right Inner_Horz")

* In this case, "Inner_Horz" is recognized, and the left border is drawn along the right edge
* even though both the top and bottom are specified (because top and bottom are vertical,
* not horizontal
Set_Property(@Window:".OLE_PICTURE", "OLE.BorderAlignment", "Left Top Bottom Inner_Horz" )