Solutions for authenticating web APIs is an important topic and there are many solutions available. Some methods are easy to implement locally and others require outsourcing to a security solution provider. The SRP HTTP Framework ships with a few pre-built authentication methods so developers have an out-of-the-box solution. However, the authentication framework is extensible. Developers can add to or modify it as needed. Alternative ways of handling authentication will be covered in separate articles.
Authentication versus Authorization
The terms authentication and authorization are sometimes used interchangeably and they seem analogous. While they are related, they do mean different things and it is important to understand those distinctions.
Authentication is the method to confirm a user's identity (i.e., Are they who they say they are?). This is often handled through a username and password but it can be handled in various other ways (facial scanning, fingerprint reading, responses to text message on your cell phone). The purpose of authentication is to grant or deny the user access.
Authorization is the method to identify a user's permissions (i.e., What can this user do?). Sometimes these permissions are referred to as privileges or scope. Permissions are often configured through a user management tool.
To use an analogy of someone entering an office building, authentication should be used to grant a visitor access to the lobby, but authorization should be used to identify which hallways and office rooms that are accessible to the visitor.
Some security methods combine the two, such as OAuth. Other security methods just assume an authenticated user is fully authorized to access everything. The pros and cons of these methods is worthy of another article. The main takeaway here is to understand the caveats of each implementation and to avoid the mistake of treating authentication the same as authorization (or vice-versa).
Enabling Authentication
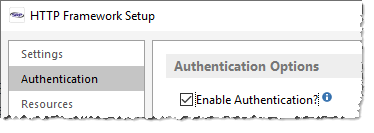
Regardless of which authentication method(s) will be used, the Enable Authentication option needs to be set. Otherwise, the SRP HTTP Framework will automatically authenticate each request as valid (although any internal authorization logic will still work as normal). To set this option, run the HTTP Framework Setup form (e.g., EXEC NDW_HTTP_FRAMEWORK_SETUP from the System Monitor) and then click on the Authentication menu to open the Authentication Options page. Make sure the Enable Authentication? box is checked:
Using HTTP Basic Authentication
The SRP HTTP Framework provides built-in support for HTTP Basic Authentication. This is a simple username and password method for identifying the web user. It conforms to the stateless constraint of REST because it assumes that each and every request will use HTTP Basic Authentication. Thus, this does not inherently provide a way of "logging in" to the web application. Because the user credentials are passed included in the HTTP request, it is highly recommended that this form of authentication only be used through an encrypted transmissions (i.e., HTTP over SSL or HTTPS for short).
Enabling HTTP Basic Authentication
In addition to the Enable Authentication option being set, the Enable HTTP Basic Authentication option also needs to be set. This option is immediately below the Enable Authentication option on the Authentication Options page. We'll review the sub-options for this later.
Creating a Web Account
Unless changed by the developer, user credentials are maintained in the WEB_ACCOUNTS database table. To manage web accounts just run the Web Accounts form (e.g., EXEC NDW_WEB_ACCOUNTS). To create a new user you can enter in an ID and populate the rest of the fields manually or you can click on the New Account menu option. This will dynamically generate an ID and prepopulate other fields for you:
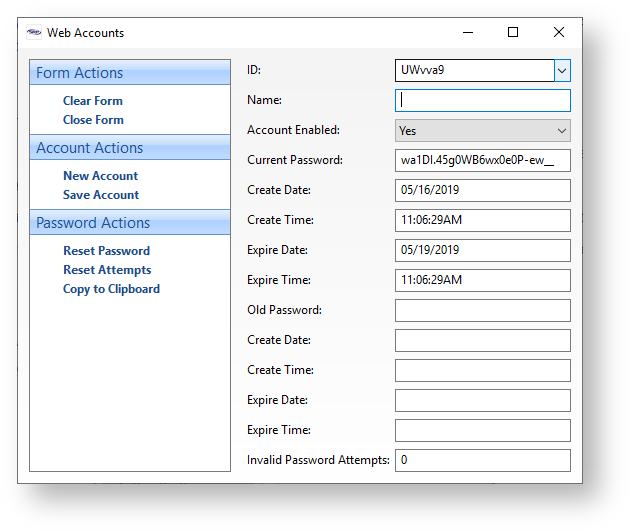
The Name field must be updated (it's a required field in this form) and the Save Account menu option clicked. We'll review the other fields later.
Authenticating the HTTP Request
The Wikipedia article on HTTP Basic Authentication provides an easy to understand overview of how usernames and passwords are to be Base64 encoded and then added to the HTTP Authorization request header. API testing tools like Postman make this very easy to implement. Here's a simple guide:
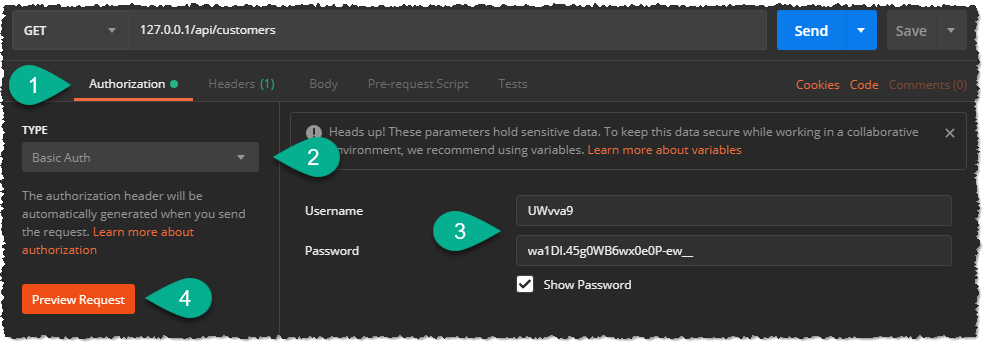
- Click the Authorization tab (Note: Even though the term Authorization is used, it is technically Authentication).
- Pick HTTP Auth as the authentication type from the dropdown.
- Enter the Username and Password (for demonstration purposes, the above screenshot uses the same username and password that was auto-generated by the Web Accounts form). You might want to enable the Show Password chekbox as well.
- Click on the Preview Request button. This last step is necessary to transfer the authentication information into the HTTP Authorization request header. You can confirm this by clicking on the Headers tab (the one to the right of the Authorization tab):
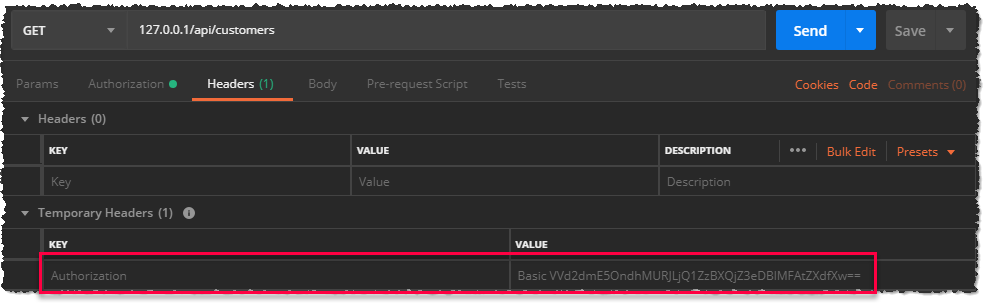
The HTTP request can now be submitted by clicking the Send button and the SRP HTTP Framework should identify the username and password correctly and return an appropriate response. We'll discuss how APIs can identify the username and password used in the HTTP request for authorization purposes in another article.
Using Non-Authenticated URLs
Non-Authenticated URLs are special URLs that are intended to by-pass the default authentication requirements. That is, even if you have HTTP Authentication enabled, any URL that appears in the list of non-authenticated URLs will be accepted automatically. Note, these URLs (or endpoints) do not need to include the Home and API URL portion.
The purpose of this list is to allow requests between trusted servers to be processed automatically. A common example of this is with OAuth. OAuth works when the server you are trying to access requests an access token from a 3rd party (e.g., Facebook, Google, Microsoft, etc.). This access token grants the requesting server access to various resources on the 3rd party (aka identity provider) platform. The negotiation between the requesting server and the identity provider is handled behind the scenes through trusted URLs. Since an identity provider cannot be expected to know how to authenticate itself to each and every requesting server, it is expected that the requesting server provide at least one URL that can be reached without any authentication.
Another use for a non-authenticated URL is for ping tests. Granted, any URL could be used for ping testing, but these will only return a generic 401 (Unauthorized) response. If you want to return a specific response, then create an API for it and add it to the list of non-authenticated URLs.
Whitelisted IPs
There are cases where a web server only exists to serve a limited range of clients. Whitelisted IPs provides a way to note which IP addresses are permitted to make API requests. If there are no IPs whitelisted then all IPs are permitted. This does not by-pass authentication (i.e., this is not the same as a non-authenticated URL). All requests will still need to be authenticated, assuming authentication is enabled.
Authentication Failures
The default SRP HTTP Framework authentication logic performs two types checks as described below.
401 Unauthorized Request
Any request that fails to authenticate itself properly will automatically be rejected with a response like this:
Status: 401 Unauthorized (RFC 7235)
Access-Control-Allow-Origin: *
Content-Type: application/problem+json
Content-Length: 113

{
   "type":"about:blank",
   "title":"Unauthorized (RFC 7235)",
   "status":401,
   "instance":"http://127.0.0.1/api/customers"
}
403 Forbidden
Any attempt to authenticate with a disabled web account will be rejected with a response like this:
Status: 403 Forbidden
Access-Control-Allow-Origin: *
Content-Type: application/problem+json
Content-Length: 138

{
   "type":"about:blank",
   "title":"Forbidden",
   "status":403,
   "Detail":"Account UWvva9 is disabled.",
   "instance":"http://127.0.0.1/api/customers"
}